
The Bond Disc software is intended for use by analysts, researchers, journalists, lawyers, patent attorneys, engineers, corporations and other people or organisations who deal with intellectual property and look for an easy-to-use and reliable solution to protect their IP. This software is supplied as is and no warranties, express or implied, are made to its fitness for a particular purpose. You are granted a license to use this software if you abide to the conditions set forth in this document.
If you use this software solely for non-commercial purposes it is provided to you free of charge. Considerable effort has gone into developing this software, and if you find it adds value to your work, please visit our website and consider a donation of Euro 10 to fund our work.
If you use this software as part of your business or professional activity, please visit the Bond Disc website and pay a fee of Euro 25. You will be issued an invoice and a registration number that acts as proof that you are entitled to use this software.
The Bond Disc software and accompanying files, data and materials, with the exception of those mentioned in the section Other Copyrights, are copyright © 2010 Simulation Systems Research Corporation Ltd (SSRC). The software is licensed, not sold. This agreement only gives you some rights to use the software. SSRC reserves all other rights. You may not rent, lease, modify, translate, reverse engineer, decompile, disassemble or create derivative works based on the software.
You may copy and distribute copies of this software, provided that you give any recipient a complete, unaltered copy that includes all files of the original distribution, including this license agreement and its disclaimer of warranty.
Some jurisdictions prohibit certain classes of citizens to use encryption technology, or restrict its application. For example, if you work for law enforcement authorities you could be allowed to employ encryption, whereas ordinary citizens are not. If you are in doubt whether you are permitted to use encryption technology, seek legal advice. If you have no general permission to use encryption technology, you must not enable Bond Disc's encryption features, or alternatively use a Bond Disc version with an encryption algorithm and master key that conforms to the requirements of your jurisdiction. Bond Disc's encryption features are disabled by default. The MIL08 encryption algorithm has no master key.
This software, and all accompanying files, data and materials, are provided "as is" without warranty of any kind, either express or implied, including, without limitation, the implied warranties of merchantability, fitness for a particular purpose or non-infringement. The entire risk arising out of use or performance of the software remains with you.
SSRC's entire liability and your exclusive remedy under this license agreement shall not exceed the purchase price (Euro 25 per license). To the maximum extent permitted by applicable law, in no event shall SSRC or its suppliers be liable for any damages whatsoever (including, without limitation, damages for loss of business profit, business interruption, loss of business information, or any other pecuniary loss) arising out of the use of, or inability to use, this software, even if SSRC has been advised of the possibility of such damages. In addition, in no event does SSRC authorize you to use the software in applications or systems where the software's failure to perform can reasonably be expected to result in a significant physical injury, or in loss of life. Any such use by you is entirely at your own risk, and you agree to hold SSRC harmless from any claims or losses relating to such unauthorized use.
This agreement is the complete statement of the agreement between the parties on the subject matter, and merges and supersedes all other or prior understandings, purchase orders, agreements and arrangements.
The icons used in the Bond Disc user interface are modified versions of icons produced by the Tango Desktop Project, www.tango.freedesktop.org. These icons are copyright of the Tango Desktop Project and subject to the Creative Commons Attribution Share-Alike license available at www.creativecommons.org. A subset of the icons comes from the GNOME Desktop Tango theme and is subject to the GNU General Public License. Bond Disc incorporates Bzip2 compression. Bzip2 is copyright of Julian R Seward. For details please see www.bzip.org.
Currently installation is supported for Windows XP (with service pack 2) and later operating system versions only. 32-bit and 64-bit operating systems are supported. If you need a version for an Intel Itanium server, please contact our technical support. You need administrator rights to install the Bond Disc application and driver.
Please run the provided Bond Disc installer and follow the on-screen instructions. If you have an earlier version installed, please uninstall this version first. For additional details see the step-by-step installation instructions.
After the installation has completed successfully you can access the integrated ramdisk (shown as a hard disk under My Computer, drive Z: by default) and find the Bond Disc icon added to the taskbar. You can click the icon to access the configuration dialog or obtain help at any time. If the installation didn't complete successfully, please refer to the troubleshooting section.
|
The Bond Disc icon |
If the Bond Disc taskbar icon doesn't appear on the taskbar, please display the hidden icons by clicking on the small arrow symbol next to the visible icons.
If you have the option to customize the icon, it is recommended that you select to show the icon always. The Bond Disc taskbar icon shows you the ramdisk and backup status at a glance and provides you access to the configuration dialog.
After you have successfully installed Bond Disc, please click on the taskbar icon to bring up the configuration dialog.
The top left text box states the name of the archive, i.e. its filename if you choose to backup the ramdisk to a hard disk. The options under the heading persistence determine whether the ramdisk content is automatically saved or not at all.
If you enable persistence the ramdisk content is backed up when the system shuts down and reloaded after reboot. A backup is also created if you upload a different archive to the ramdisk, which swaps out the current archive for another. If persistence is disabled, a backup is only written if you trigger it manually.
 |
Renames the archive |
 |
Triggers a backup of the ramdisk |
The large long box further below displays the full path and filename of the archive. If there is a small icon to the right of the path, it displays the current backup status of the archive. You can click on it to receive further information.
If you wish to view the contents of an archive, simply double-click on it in the Windows file manager.
If you click on the icon to the left of the path, you can enable encryption. If you choose to encrypt the archive, you need to specify an encryption key before the archive can be backed up. To do so, please click on the lock icon.
If you have enabled persistence, you are required to enter the key after each boot for the ramdisk to be initialized with content.
 |
Sets a new encryption key |
 |
Brings up the control center where you can change the size of the ramdisk. |
After reading this section, you know the basics of Bond Disc. Your ramdisk and secure archive manager is ready to use.
If you wish to explore the more advanced features of Bond Disc, please feel free to browse this manual. You can start by exploring the underlined links in this section. If you wish to explore the more advanced features of Bond Disc, please feel free to browse this manual. You can start by exploring the underlined links in this section, or you can check out our online press tour that doubles as a tutorial.
You can bring up this manual and obtain help by pressing the F1 key or right-clicking the question mark in one of the Bond Disc dialogs at any time.
1. License
2. Installation
4. Features
5. Help
6.1 Ramdisk
6.2 Archive
6.3 Persistence
6.4 Encryption
6.5 Taskbar icon
8.1 Archive label
8.2 Archive abstract
8.3 Encryption key
8.5 Seal
8.6 Ramdisk size
8.7 Error correction
8.8.1 Compression
8.8.2 Ramdisk drive and cache
8.8.3 Backup options
8.8.4 Upload options
8.8.5 Security
9.1 Extract files
9.7 Uninstall
9.8 Changes to Windows services
10.1 Detailed installation instructions
10.2 Troubleshooting the installation
10.3 Technical support
Bond Disc is a powerful solution to manage, archive and recover files that hold valuable information. We originally looked for a solution to store the results of our work, designs of inventions, technical descriptions and other classified documents, in short priceless information, in a fail-safe reliable way for months, years or even decades. On the other hand the data needed to be perfectly secure without requiring us to spend millions on corporate security as the large corporations do to protect their assets. Critical for us, and the reason to develop Bond Disc, is the combination of four key features:
Total Reliability
Extensive use of parity and redundant data storage enables you to recover your
files even under conditions of severe scrambling or in the case that the storage medium has
large defective areas. → details
Perfectly Secure
Military-grade encryption that exceeds current 128-bit encryption standards and
keeps your data secure even against the most powerful attacker for decades to
come. → details
Ease-of-use
An integrated ramdisk lets you work with your files as you are used to. You
control how the ramdisk is initialized and when and how your files will be
saved, or if you desire, they will never touch your computer's hard disk.
Document Sealing
You can seal a document which effectively prevents its decryption. Your peers
or partners can add their seal to the same document which prevents access to
the document until all parties unseal it.
At any time while running the configuration dialog you can press [F1] or the question button to call up this help file. If you perform a right-click on a dialog element you will receive context-sensitive help information.
To access the configuration dialog, click on the Bond Disc icon in the taskbar.
Bond Disc provides you with a ramdisk that you can access through the Windows file manager in the same way as your other local disks. By default it is mounted as drive Z: but you can change the drive letter.
The files on the ramdisk reside on RAM that is managed by a protected kernel mode driver. This makes access to your data faster and more secure than on your other local drives.
If you enable persistence and autosave, the data is saved in regular intervals to an archive that resides on a hard disk. File corruption due to system crashes never occurs on a ramdisk and the archive file format is highly redundant and secure. Even in the unlikely case of a damaged archive the automatic error correction and file versioning rules give you the best chance to recover your files intact. For details, please see persistence.
You can change the size of the ramdisk up to a maximum of 640 MB. Files on the ramdisk are preserved while you change its size. There is no need to manually store and reload files.
From the control center you can erase the ramdisk, i.e. securely zero its content, and unload the ramdisk. The latter frees the memory allocated by the ramdisk. If you have enabled persistence, the ramdisk content is automatically restored if you reload the ramdisk.
From the archive manager and control center you can upload a different archive or add files to the ramdisk.
 |
Uploads an archive to the ramdisk (replaces its current content) |
 |
Adds files to the ramdisk |
The Bond Disc taskbar icon provides you with an overview of the ramdisk status at a glance. In the lower left corner of the icon is the upload archive status and in the lower right corner the backup status. Ideally both should be green triangles.
You can lock the ramdisk. This blocks access to the ramdisk temporarily, for example while you browse the web. If you leave your PC or laptop unattended, it is recommended that you purge and unload the ramdisk to protect confidential files. The security options give you control over how the ramdisk secures your data during system power changes and hibernation.
A backup of the ramdisk produces a Bond Disc archive. The archive contains all files on the ramdisk at the time the backup was triggered. Uploading a Bond Disc archive restores all files to the ramdisk.
An archive is identified by its name and its session ID. The archive is named by you and the session ID is generated automatically. The filename of the archive consists of the name, a session suffix and the file extension .sec. Once an archive is created it is never modified. It remains on hard disk until it is deleted. The autoclean options give you control over how many archives are preserved.
The resulting list of archives, identified by the same archive name but with different session suffix, gives you access to different versions of the files held by the ramdisk. Typically one archive is created per day when the system shuts down. You can create more archives by manually triggering a backup. On reboot the most recent archive is restored to the ramdisk.
You can copy an archive to any PC or laptop to continue working with your files seamlessly.
The archive manager gives you access to individual files in any archive you select. You can drag files to any Windows file manager window. You can also add all files that are newer to the ramdisk, to synchronize the files from a laptop or data stick with one single action.
In addition to the files from the ramdisk an archive contains a label that describes its content. If you provide software or other content in a Bond Disc archive, you can also specify an abstract that provides a full documentation, a preview or a demo. The abstract file can be of any type and is always accessible, even if the archive and main content remains encrypted.
Most archive properties can be set in the configuration dialog. The backup properties of the archive, e.g. its persistence and compression, are also saved and restored when the archive is uploaded.
Basically persistence pertains to the question whether the files on the ramdisk are stored permanently or not. Enabling persistence means that the files on the ramdisk are backed up to a Bond Disc archive automatically when the system shuts down or you upload another archive. Disabling persistence means the files on the ramdisk are not backed up at all, except when you trigger a backup manually.
If you enable persistence and autosave, a backup is created in regular intervals. The autosave creates a new archive first before it deletes the previous autosave. This ensures that the last autosave is always valid, and that in the case of a power failure, the changes lost are limited to the period you have set as a autosave interval. A five minute interval is typically recommended. As a plus you can rest assured that the integrity of the data on the ramdisk is preserved. File system corruption due to power failures or system crashes does not happen on a ramdisk.
The backup procedure performs a considerable number of validity checks to ensure the integrity of the files saved and computes multiple checksums over all elements stored. If the archive manager can read a Bond Disc archive, you are guaranteed that the data retrieved matches the data stored. E.g. you can easily verify that an archive you have copied to a memory stick is intact by performing a double-click on it and having the archive manager reading it.
Bond Disc can add parity and mirror data to add another level of reliability to an archive. I.e. an archive file contains another copy of the data plus two streams of parity information that are interleaved and written to different parts of the archive to achieve maximum reliability if one or multiple parts of the archive become unreadable.

While this approach technically triples the file size, it makes it possible to recover the data from archives that have endured decades of storage on DVD or are transmitted over noisy wireless networks with lots of static interference. The increase in file size is offset by the built-in Bzip2 compression. This more than compensates for the added redundant data and normally a Bond Disc archive with parity and Bzip2 compression requires considerably less space on hard disk than the individual files on the ramdisk would require on a regular Windows partition.
Generally it is recommended to enable parity generation. Bond Disc computes the checksums of all data retrieved and refuses to read an archive that is faulty. If parity information is not available, it it is next to impossible to retrieve data from a defect archive that is encrypted and a considerable effort to restore non-encrypted data.
Still, there are scenarios in which it is better not to generate parity. If you can easily reproduce the data, or distribute copies of Bond Disc archives in large quantities it is recommended to disable parity to maximize the gains of the Bzip2 compression to save on bandwidth and/or storage media capacity.
Bond Disc has a built-in error correction for archives with parity. The error correction can be configured to either work best for burst errors typically found on defect storage media or alternatively to correct errors from network transmissions that are typically more stochastically distributed.
While the built-in error correction works well in the most common cases, in some scenarios more is known about the probability of certain errors and a more efficient algorithm can be employed. The following table lists the generated parity. This information enables third parties to develop their own error correction and recover data that would otherwise be lost.
| Parity mode | Bit 3 | Bit 2 | Bit 1 | Bit 0 |
|---|---|---|---|---|
| Parity 1 | 11110000 | 00111100 | 00001111 | 01010101 |
| Parity 2 | 01111100 | 11101011 | 00111010 | 10100110 |
In the case that an archive could not be read, it might still be possible to retrieve a file from an earlier archive version. At the end of each session, also when another archive is uploaded and on autosave, a new archive is created. These archives differ only in their session suffix. The session suffix is technically a timestamp of 100 nanoseconds resolution, so no two archives created on one system will bear the same session suffix.
Except of the archives created by the autosave function, in which case only the last autosave of the current session is preserved, all other archives created as a backup are persistent. That means typically the backup creates a stream of archives located in a folder on your hard disk. You can easily add another backup to this list, whenever you reach a small milestone, when you have finished writing a letter or added a software module etc. The Bond Disc backup button is never more than two clicks away.
The stream of archives in your backup folder is technically a chronologically ordered list of snapshots of the files on your ramdisk. This gives you access to different versions of a file up to its most recent state. To keep the list of archives manageable, you can set a limit to the maximum number of archives stored. You can also exempt archives from deletion as long as they are not older than a specified time.
In contrast to the most common encryption methods used today, which encrypt relatively small blocks of data separately, Bond Disc applies a strong cryptographic algorithm over the entire archive. In contrast todays block-based 128-bit encryption algorithms that encrypt a single block of data in a tiny fraction of a second are increasingly vulnerable to honed brute force attacks from attackers that have massive computing power available. Once a single block is decoded, all data that uses the same key loses its protection.
Bond Disc employs a computing intensive cryptographic algorithm that uses a combination of advanced data scrambling, bit manipulation, far data swaps, variable encryption paths and a strong correlation between the content and key to create an extremely strong encoding of an archive. A change to just a single bit of the content affects the entire encrypted content, that is every byte of it is changed.
The time required to encrypt a Bond Disc archive of average size is about 30 seconds on a state-of-the-art PC. A 128-bit key represents 3.4 * 1038 possibilites and the time required for a brute force attack, i.e. probing all possible keys, on a Bond Disc archive requires the equivalent of roughly 1040 seconds, that is more than 1032 years, processing time. Assuming that the most powerful attacker today has 5 billion times the processing power of a modern PC available, and allowing for a further 108 margin because people tend to utilize only a subset of the keyspace, a brute force attack would still need about 1014 years. Considering that the computing power available will double every 18 months, a successful brute force attack on a Bond Disc archive is not likely before the year 2070.
You can add a seal to an encrypted archive. Each seal added increases the encryption of an archive by another 128-bit. An archive can only be decrypted once all seals have been removed.
Additionally you can upgrade the encryption strength. The standard encryption has strength one. Each increment of the strength doubles the time required to encrypt and decrypt the archive. Use this feature carefully, the encryption strength eight needs already up to one hour processing time.
The Bond Disc support website offers additional professional services to protect your archives and to support a wide range of corporate data protection schemes. You can order a customized Bond Disc version that enhances the encryption of your archives with an individual key component. Any archive encrypted with your individual Bond Disc version can only be decrypted with the same version. I.e. even if someone gains access to your archives and to your key, they will not be able to access the archives with any other Bond Disc version.
The level of reliability and security Bond Disc archives offer enables more open and distributed data storage strategies. It is entirely feasible to store sensitive data and internal corporate documents in Bond Disc archives. These archives can be deposited and distributed by regular websites. Only recipients with the proper key and Bond Disc version can access these archives. It is also feasible to devise department based sealing strategies, which can be automated by servers in the intranet.
While it is generally secure to store Bond Disc archives on the web, it is still recommended to apply an individual seal to each archive with sensitive information. This will protect your data in the case your key becomes compromised. Don't forget, the world wide web does not forget. Once a document has been published on the web, there is every probability that it will be copied and stored on another server and will linger there for years even if you delete the original file.
It also becomes much more secure to store sensitive information on a notebook or memory stick. If the notebook is lost or stolen, the data will be useless to other parties. To work with your notebook as usual, it is only necessary to enter the key once at the beginning of each session. This provides you full access to your data while the security is taken care of by Bond Disc.
If security is critical, never open a Bond Disc archive on a PC connected to an unprotected network. You can still safely view the archive directory, label and abstract from the archive manager without entering the key. To access the archive content transfer the archive to a secure PC first.
The Bond Disc icon, which looks like a silver disc, shows you the ramdisk and encryption status at a glance. In the lower left corner is the upload archive status, in the lower right the backup status. A small lock symbol is displayed if the ramdisk drive is locked. An overlayed small shield is shown if encryption is enabled.
|
The Bond Disc icon |
The icon status codes are:
 |
no error, status ok; |
 |
read/write error, check the configuration dialog for details; |
 |
files on ramdisk modified, but not saved to hard disk; |
 |
no file for initialization of ramdisk; |
 |
indicates a pending operation or no response from the Bond Disc driver; |
 |
encryption key missing; if this icon is shown in the configuration dialog it signals that the archive initialization failed; a click on the icon triggers a reload of the last backup; |
 |
ramdisk locked. |
Clicking on the Bond Disc icon brings up the configuration dialog.
Right-clicking on the icon brings up a menu with additional options.
The current session dialog can be accessed by clicking on the Bond Disc taskbar icon or by clicking on the archive encryption icon of the current session file box in the control center.
In the current session dialog you can configure how the files on the ramdisk are backed up to hard disk. You can also enter an encryption key to retrigger the upload of an encrypted archive.
|
Triggers a backup of the ramdisk. |
|
Renames the archive. It is sufficient to specify the name only, the session suffix and file extension are added automatically. |
 |
Toggles between an archive manager's view of the files on the ramdisk and the properties. |
|
Sets a new encryption key. |
 |
Opens the seal archive dialog. |
|
Opens the control center where you can change the size of the ramdisk. |
The menu is described in detail in the archive manager dialog. Both menus work identically.
The upper left text box displays the archive name. The archive name is an integral part of the filename and identifies all backups associated with it.
To the right of the archive name is the current session ID. It is generated automatically. The session ID identifies an individual backup of the archive. All backups associated with one archive share the archive name but differ in their session suffix.
Here you can select whether the files on the ramdisk are backed up to hard disk. In the case that you select no backup you can still trigger a backup manually, but no backup is created automatically when the session is terminated. Choosing read at initialization loads the most recent backup after a system boot, but doesn't save changes.
If you enable data mirroring and parity, information for automatic error correction is saved with a backup. For details please see parity. If you enable autosave a backup is triggered when changes to the ramdisk have not been saved for the interval you specify. An interval of five minutes is recommended for most cases.
This box displays the full path and filename of the current archive backup. If
the file properties are shown it signals that a backup with the current session
ID has been written. The small icon to the right of the path displays the
backup status. You can click on it to receive further information. If the
backup status shows  ,
it indicates that the most recent backup could not be restored because the
encryption key was not valid. A click on this icon triggers a reload of the
most recent backup.
,
it indicates that the most recent backup could not be restored because the
encryption key was not valid. A click on this icon triggers a reload of the
most recent backup.
 |
Public |
 |
Encrypted (publish directory) |
 |
Encrypted (hidden directory) |
The small icon to the left of the path is the encryption mode of the archive. You can click on it to change the mode. If you enable encryption, you are required to set an encryption key before the archive can be backed up.
 |
Edits the archive label |
 |
Displays and resets the archive abstract |
If you click on the small arrows down at the right side or bottom of the window, the dialog is extended to show additional archive properties. Clicking on the arrows again hides the extended properties.
Compression reduces the file size of a backup but costs time. Simple runlength compression is fast and can produce good results if you have selected to store file system metadata and zero unused clusters. Bzip2 compression is the most powerful compression available. Higher levels produce better compression ratios but take more time.
Autoclean limits the number of backups associated with one archive, i.e. which share the same archive name and are located in the same folder, to a maximum you specify. The most recent archives are preserved. Autoclean is performed when you close the control center or if you don't open the control center once approximately one hour after session begin.
You can set a different limit for temporary backups. A temporary backup has an internal error flag set and is marked by an E as the first letter of its session suffix. A temporary backup is created for instance if an archive has been uploaded partially only and is autosaved. If you trigger a backup manually the temporary marker is removed.
You can exempt backups that are not older than a period you specify from being deleted by the autoclean function. An interval of 90 days is recommended.
Store file system metadata creates a backup of the entire ramdisk image inclusive the recycle bin and all file manager generated data. The image is restored to the ramdisk unaltered on upload. This option is mainly intended for data recovery and file system developers. The abstract feature is not available in this mode if the archive is encrypted.
Each archive has its own set of properties. These settings are saved with a backup and restored on upload. In addition to the individual archive settings a global override exists. If you select Archive in the settings box the individual archive settings are applied. If you select Global the current global settings are applied to the archive.
A click on the arrows below the setting selector transfers the current
individual archive settings to the global settings and vice versa. You can
distinguish an archive and global setting by the small triangle  applied to the global property item.
The archive manager can be accessed by double-clicking a Bond Disc archive in the Windows file manager, by dragging archive files to the Bond Disc application icon on the desktop, or by clicking on an archive encryption icon in the control center.
The archive manager gives you access to individual files in any archive you select. You can view the directory and drag files to any Windows file manager window. You can also apply and remove the seals of an archive and upload the entire archive or files to the ramdisk.
 |
Extracts files from the archive |
|
Uploads an archive to the ramdisk (replaces its current content); if the icon displays also a small shield the current archive key is transferred and replaces the current session key with the upload. |
|
Adds the archive files to the ramdisk |
 |
Sets a new encryption key for the displayed archive only |
|
Opens the seal archive dialog |
|
Opens the control center |
Reloads the list of files displayed in the file browser.
Retrieves and displays the archive properties from the archive file header.
Displays the archive label.
Closes the archive manager window.
Selects all items displayed in the file browser.
Inverts the selection in the file browser.
Clears the current selection in the file browser.
This menu triggers the same actions as the buttons in the toolbar.
Toggles the file browser view between a hierarchical directory and a flat list that shows all items.
If this setting is enabled, folders are sorted in the file browser before other items.
If enabled, the encryption key of this archive is transferred and replaces the current session key if you upload the archive to the ramdisk.
Transfers the current settings inclusive the window layout and file brower sort criteria to all other archive manager windows.
Makes the current settings the default for all newly opened archive manager windows. Please note that the first ten archive manager windows have their own individual settings. To transfer the settings to these windows you can use the Apply to All Archives action.
Displays this manual.
Displays the license.
Displays the application version and related information.
The file browser displays a list of all files in the archive. If the archive is
encrypted and the directory hidden, this list can be empty. If the archive is
encrypted and the directory public, all files that are not accessible show a
small lock symbol  to
the left. The abstract is marked by a small
blue star
to
the left. The abstract is marked by a small
blue star  .
.
If you have selected Settings - Show All the list contains all items in
the archive. Otherwise the file browser presents you with a hierarchical
directory view. If you double-click on a directory, the view changes to show
the files in the directory. Double-clicking the
..
item returns you to the parent directory.
You can change the size of the columns by dragging a column separator in the header.
You can sort the items in the file browser by clicking on a header item. Clicking twice on a header item reverts the sort order.
If you select Settings - Separate Folders the folders are sorted before the other items.
The control center can be accessed by selecting Control Center from the taskbar icon right-click menu, or by clicking the control center button in the archive manager or current session dialog.
The control center gives you detailed control over how the ramdisk works. You can also review which archive file has been uploaded to the ramdisk and reset the encryption key.
 |
Creates a new archive with a default name; it is recommended that you rename the archive to reflect its content. |
 |
Displays the advanced settings dialog. |
 |
Begins editing of an encryption key that is used for uploading one archive only. |
 |
Cancels editing of an encryption key. |
 |
Locks the ramdisk, i.e. prevents access to it. |
 |
Unlocks the ramdisk or prompts you for a valid key if the locked ramdisk holds an encrypted archive. Click the Unlock button in the encryption key box to enter and confirm the key. |
 |
Purges the encryption keys and cache. |
 |
Opens the seal archive dialog. |
 |
Opens the error correction. |
 |
Displays the license. |
This section shows you information about the ramdisk: its current size, the available space on the ramdisk and the system memory used to maintain its operation. Four buttons allow you to reconfigure the ramdisk and release resources.
This button lets you resize the ramdisk. The files on the ramdisk are preserved during this operation. If the ramdisk size chosen is too small to hold all the files on the ramdisk, you will receive an error message.
This button reformats and clears all files from the ramdisk. Use with caution.
Clears the archive cache. The cache is used speed up the reload of archives by the archive manager. It saves you the time to wait for an archive to be decrypted and decompressed, if you access files from it multiple times. The size of the cache can be adjusted in the drive settings.
This button frees the memory required by the ramdisk, or if unloaded, reestablishes the ramdisk operation. Use this with caution, if you unload the ramdisk and haven't enabled the persistent backup to hard disk or saved your files, you will lose your files on the ramdisk.
This box is technically identic to the encryption key dialog you can bring up from the current session dialog. Alternatively you can specify a new encryption key here.
This box is also used to prompt for a key to confirm unlocking of the ramdisk and to edit a key that is used for uploading one archive only.
There are four boxes in total that display information about the archive upload history and allow you to upload other archives of your choice. If there is a small icon to the right of the archive filename it indicates the backup status for the current session and the archive upload status otherwise. You can click on the status icon to receive further information.
Clicking on the encryption mode icon to the left of an archive brings up the archive manager that offers a view of the files in the archive.
To the right of the encryption mode icon is a toggle that lets you switch between the filename, label and abstract of the archive. You can edit the label and abstract by clicking on the text box that contains either.
|
Triggers a backup of the ramdisk. |
|
Selects an archive name. If you rename an archive, it is sufficient to specify the name only, the session suffix and file extension are added automatically. |
|
Uploads an archive to the ramdisk (replaces its current content). |
|
Adds the files from the selected archive to the ramdisk. |
 |
Discards a backup reference. |
 |
Recovers a backup reference. |
This box is identic to the path and filename displayed in the current session dialog which you can bring up by clicking on the encryption mode icon to the left. It also contains buttons to backup the current archive and to rename it.
The last session refers to the most recent backup, if it has not been uploaded
yet. If the backup status shows ,
it indicates that the archive hadn't been uploaded because its decryption
failed. You can retrigger an upload by clicking on this icon, or it is
triggered automatically if you set a new encryption key.
The last known good session refers to last backup that had been uploaded to the ramdisk successfully.
In this box you can select an archive of your choice. Once you have selected an archive you can view its content by clicking on the encryption mode icon. You can also upload the archive or add its files to the ramdisk. The former replaces the current ramdisk content, the latter adds the files to the current content.
The autosave, parity and persistence options are identic to the same options in the current session dialog.
If this option is enabled, the ramdisk is resized to match the size of an archive that is being uploaded. Otherwise the current size remains unchanged.
This option determines whether the replace files dialog is displayed, which gives you control over how the replacement of existing files is handled.
|
Opens the archive label editor |
The archive label editor can be accessed by clicking on the label button in the current session dialog, by selecting Description from the archive manager menu, or by clicking on a label in the control center's archive file review.
The archive label is a description of the content and always accessible irrespective of encryption. It is limited to text and its maximum size is roughly 6,000 characters. If this description is insufficient for your purposes, you can add an abstract to the archive.
This box contains the full path and filename of the archive to which this label belongs. If this archive is the current session, you can edit the label, otherwise you can review it only.
Here you can review or edit the description. If the label is editable there is additionally a Clear and Cancel button at the bottom. The changes you have made are only saved if you confirm the editing by clicking the OK button.
|
Opens the archive abstract dialog |
The archive abstract dialog can be accessed by clicking on the abstract button in the current session dialog, or by clicking on the abstract in the current session box of the control center's archive file review.
The archive abstract serves as a reference to the content. It is always saved unencrypted and stored in the root directory of the ramdisk. The abstract file can be of any format and size. For example it can be a formatted text document or a demo. If the option read abstract if decryption fails is enabled, the abstract is uploaded to the ramdisk if the user does not have a valid encryption key to open the archive.
This box contains the full path and filename of the archive to which this abstract belongs.
Here you can review or set the abstract. You can browse for a file to choose a new abstract. If you choose a file on another volume or in another directory, the file will be copied to the ramdisk root directory. If you wish to replace an abstract that already exists, you need to tick the Overwrite existing file option. The changes you have made are processed only if you confirm the dialog by clicking the OK button.
The abstract is marked by a small blue star
if you review the archive content in the archive
manager.
For background information, please see encryption.
Bond Disc maintains one primary key that is used to encrypt the current archive. It is also used as the default key to decrypt archives. You can edit the primary key in the control center or by clicking on the encryption key button in the current session dialog.
In addition each archive manager window maintains one encryption key associated only with the archive the window pertains to. You can edit this key by clicking on the encryption key button in the archive manager.
You can recognize which key you are editing by the icon that is displayed to the right of the key. If you are editing the primary key, the encryption strength icon is shown. If you are editing an archive key, a selector is shown instead. You can click on the selector to choose whether to replace the primary key on a successful upload of the archive.
|
Primary key: brings up the encryption strength dialog. |
|
Selector: makes this key the primary key if used to upload one archive. |
|
Selector: use this key only to upload one archive. Does not replace the primary key. |
The encryption key status is shown as a small square icon to the right of the key. If this icon is missing, no key has been set yet or the key is currently being edited. Otherwise it provides you with additional information about the key.
 |
Marks a newly set primary key. |
 |
This key matches the key required to upload the archive. |
 |
Marks a key that is used to upload a single archive or to unlock the ramdisk. |
 |
Signals that the ramdisk is locked with a newly set primary key. |
 |
Signals that the ramdisk is locked with a primary key that matches the key required to upload the current archive. |
When you start editing an encryption key, the key edit box is preset randomly. You can modify the individual key characters either with the cursor keys or by typing text on the keyboard.
You can change each key character by pressing the up and down cursor keys and the page up and page down keys. The latter increment or decrement the key character faster. To move between characters press the cursor right or left keys or alternatively Tab or Shift + Tab.
If security is critical, typing the characters of the key directly is a security risk. In our modern interconnected world it has become increasingly rare to find a PC that does not contain a keyboard logger. These are typically included as a support component of software that is installed for networking or internet access. This means the characters you type are stored in a log file on hard disk. Bond Disc guards against this, if you don't type the characters directly the key cannot be tracked by keyboard loggers nor by the windows messaging system. It is highly recommended to use the cursor keys in order to prevent key tracking and also to utilize the full key space of non-printable characters.
|
Begins editing of an encryption key that is used to upload a single archive. |
|
Cancels editing of an encryption key. |
At the top of the control center is a button that switches on and off the editing of a special encryption key to upload a single archive only. If you edit this key or confirm it, the next archive upload action you issue from the control center will use this key. The selector to the right of the key determines whether this key will replace the primary key after a successful upload.
If the ramdisk is locked and requires a key to unlock its content, you can enter the key in the control center. To begin editing the key, please click on the Unlock button. If you confirm the key, this key becomes the new primary key and an attempt to unlock the ramdisk with this key is made. If this attempt fails, you can still try to upload other archives from the control center. This action uses the newly set primary key as a default to decrypt an archive.
|
Edits the encryption strength of the primary key |
The encryption strength dialog can be accessed by clicking on the encryption strength icon to the right of the encryption key editor, either from the control center or the encryption key dialog accessible from the current session dialog.
The encryption strength pertains to the primary key applied to encrypt a backup. The standard encryption has strength one. Each increment of the strength doubles the time required to encrypt and decrypt an archive. Use this feature carefully, the encryption strength eight may take already one hour processing time. The actual processing requirements depend on the size of the archive and the power of your PC.
|
Opens the seal archive dialog |
The seal archive dialog can be accessed by clicking on the seal button in the control center, the current session dialog or the archive manager.
Encrypted archives can be sealed. Each seal increases the encryption strength of an archive by another 128-bit. An archive can only be decrypted once all seals have been removed.
This box contains the full path and filename of the archive to be sealed. You can browse and select another archive. Note that only archives that are encrypted can be sealed.
This box contains the key editor that works identically to the encryption key editor. Each seal is technically another 128-bit key. You can use the keyboard and cursor keys to edit the key. For security considerations related to editing a key please see secure editing.
To the right of the key is the seal status with a short descriptive text. In the upper right corner is a display of the number of seals applied versus the number of seals removed.
If you click the Seal button the currently specified seal is applied to the archive. Vice versa clicking the Unseal button removes a seal from the archive. The Reset button presets the key editor with a new set of randomly created characters. Close exits the dialog without taking further actions that would modify the archive. Once closed the key editor is reset to remove traces of the key you specified.
Please note that each seal and unseal action modifies an archive file. It is recommended that you create a backup copy of a sealed archive before you attempt to unseal it. This enables you to restore an archive to its original sealed state in the case that the unseal action did not succeed.
The change size dialog can be accessed by clicking on the Change button in the upper right corner of the control center.
The ramdisk size is variable and can be set up to a maximum of 640 megabytes.
You can set a new size for the ramdisk in the provided text box. Once you have specified the size a click on the Apply button resizes the ramdisk. The files on the ramdisk are preserved during this operation. If the ramdisk size chosen is too small to hold all the files on the ramdisk, you will receive an error message.
If this option is enabled, the ramdisk is resized automatically to match the size of an archive that is being uploaded. This option is identic to the autoresize option in the control center.
Bond Disc allocates system memory, i.e. physical RAM. How much system memory is available on your PC depends on the hardware and on the installed operating system and service pack. Note that the amount of RAM allocated for the ramdisk is not available for other applications. Please allow for a sufficient amount of RAM to remain available on your system. To release allocated memory, you can either unload the ramdisk temporarily or choose a smaller size for the ramdisk.
Please note that the Bond Disc driver allocates additional RAM temporarily during the creation of a backup. The RAM required for this operation matches roughly the size of the content on your ramdisk. You will receive an error message, if the system has insufficient memory for this operation. If you have configured your ramdisk to create a backup at system shutdown only, this requirement is dropped. Bond Disc contains a failsafe mechanism that guarantees the writing of a backup even under low memory conditions at system shutdown or hibernation.
|
Opens the manual error correction |
The manual error correction can be accessed by clicking on the tool button in the control center. The automatic error correction can be switched on and off in the upload options.
Archives that include parity information and have been damaged, can either be corrected automatically or manually. The following paragraphs describe the manual error correction. The automatic error correction is applied automatically during the upload of an archive.
This box contains the full path and filename of the archive to be repaired. You can browse and select another archive. Note that only archives that are backed up with parity can be repaired. The file selector defaults to the last archive that had been selected for upload and failed a parity check.
The manual and automatic error correction can be configured in the upload options. The technical information for third parties to build their own error correction module is provided in the parity table.
This box shows the position of the byte currently examined in the Content box. The position is a count from the beginning of the file. The first byte has the address zero.
This box shows the address of the last error found in the currently selected archive file. If the arrow to its left is red, an error has indeed been found. If the arrow is green, no error is indicated. You can click on the arrow to transfer the address from the Last error box to the Address box which brings up the corresponding byte in the Content box.
You can check the archive for parity errors with the buttons below the address field:
 |
Resets the address. |
 |
Searches backwards from the current position for a parity error. |
 |
Stops the search for a parity error. |
 |
Searches forwards from the current position for a parity error. |
 |
Sets the address to the end of the file. |
Under the heading Source you find the source byte first and the mirror byte below it. If the archive is intact both are identic. This is symbolized by a small locked chain icon to the left. You can click on the chain icon to uncouple the source and mirror bytes. If this icon changes to symbolize a broken chain you can modify the source and mirror independently.
The first line of the source and mirror byte is editable and can be modified. The second line shows the byte currently stored in the archive file. The byte value displayed is decimal, to its right is its binary presentation. The thin black lines, that lead from the binary presentation to the parity, show which source bits affect what parity bit. Note that the parity bits for the source and mirror are different.
To the right of the binary presentation is the generated parity. The parity is four bit wide. Each parity bit is set to one if the number of source bits it pertains to (follow the thin black lines) is uneven, otherwise its zero. If the icon between the binary presentation of the source and parity symbolizes a locked chain, the parity matches the source. You can click on the chain icon to uncouple the parity or match it to the source. If it symbolizes a broken chain the source and parity can be modified independently of each other.
 |
Evaluates the editable source and mirror bytes and their parity, and sets their values to the most probable correct value. This value isn't written to the archive file until you click on the Apply button. |
 |
Triggers the automatic error correction from the current position in the archive file onwards. |
If you have modified the source, mirror or parity and click on the Apply button the archive file will be updated to reflect the changes.
If you modify a source or mirror byte or its parity and hit the Apply button, or trigger the automatic error correction, you will receive a warning that the archive file will be modified unless you have disabled this warning. In any case it is highly recommended that you create a backup copy of an archive file before you attempt to repair it. If the attempt to repair the archive fails, and it contains valuable information, the backup copy preserves your chance to retrieve the data if a professional applies alternative error correction methods. Or if it is just a couple of bytes that fail a parity check, a trial and error approach can be applied.
|
Displays the advanced settings dialog |
The advanced settings can be accessed by clicking on the settings button in the control center.
The advanced settings are divided into a number of property pages. The options available are described in the subsequent sections. You can select a specific property page by clicking on its header.
The compression options can be accessed by clicking on the Compression tab in the advanced settings dialog.
These options are identic to the current session dialog's compression options but pertain to the global settings only.
The ramdisk options can be accessed by clicking on the Ramdisk tab in the advanced settings dialog.
Here you can assign a different drive letter to the ramdisk. The new drive letter is applied if you click on the OK or Apply button.
If this option is selected, the cache maintained by the driver is limited to the size you specify. The cache speeds up the upload and file retrieval times of archives that you access repeatedly. It is recommended to set a limit to the cache if your system runs low on memory. The amount of memory allocated currently by the cache is shown in the memory section of the control center. Its Clear button releases the memory allocated by the cache.
Directs the driver to allocate AWE, i.e. Address Windowing Extension, memory for the ramdisk and archive cache. AWE memory is physical RAM above the 4 GB limit used by 32-bit Windows versions. If you have more than 4 GB of RAM installed on your PC, AWE makes this RAM accessible. This option is only availabe with drivers that support this feature.
Thhe backup options can be accessed by clicking on the Backup tab in the advanced settings dialog. The options on this page pertain to the global settings only.
These options are identic to the current session dialog's autoclean options.
This option is identic to the current session dialog's autosave option.
This option is identic to the current session dialog's format option.
The upload options can be accessed by clicking on the Upload tab in the advanced settings dialog.
If this option is enabled and you trigger an action that overwrites the current ramdisk content, you will receive a reminder that details which elements have not been backed up. It is recommended to enable this option, if you have selected the backup persistence mode.
This option affects the behaviour if an upload of an archive fails. If this option is not selected and an upload of an archive fails, an error is reported and the current content on the ramdisk is left unchanged.
If you enable this option, the public part of the archive only is uploaded to the ramdisk. If the archive has an abstract, the ramdisk will typically be empty except for the abstract. The archive label and settings are also uploaded.
This option determines what happens if the Add Files action does not complete successfully. If the file transfer is buffered, the action is rolled back so that the ramdisk content remains unchanged. If the transfer is unbuffered, the files are added one by one to the ramdisk. The copy operation is terminated if a file cannot be copied.
It is generally recommended to leave buffering enabled, because it can be difficult to determine which files had been successfully transferred and which not if an error occurs. But under low memory conditions an unbuffered transfer can succeed whereas a buffered might fail because of insufficient resources.
If this option is enabled and you attempt to modify an archive file from the manual error correction, you will receive a reminder that it is more safe to create a backup copy of the file first. This option toggles this reminder on and off. For details please refer to the error correction.
This option directs the error correction to discard parity errors if the source and mirror bytes are identic. This is normally safe but in rare cases this can create false positives.
This instructs the error correction algorithm to assign a slightly higher good probability to a source or mirror byte if its corresponding parity matches. This can create false positives.
This directs the error correction to assign a higher fail probability to bytes in which neighborhood already errors have been detected. This mode is typically used to correct media errors in which continuous areas are defective.
This option activates the automatic error correction during the upload of an archive. Note that this does not modify the archive file being uploaded, only errors are corrected on the fly. It is recommended to leave this option unchecked that you are alerted to defective archives.
To repair an archive file that can be uploaded but contains parity errors, choose the error correction's automatic mode. If the same error correction settings are in effect as during the successful upload, normally the archive file will be restored to its original state. Please note that this will not work if the storage media is defective.
This halts the automatic error correction in the case that the source and mirror do not match and neither is confirmed by its parity. This is a severe error condition and this option should only be disabled if other attempts to repair an archive file have failed.
In the case of burst errors typically found on defective storage media, it is recommended to enable Discard parity error if mirror matches, disable Prefer parity match, enable Probe for disk burst errors and enable Limit automatic correction to partially consistent data.
To correct errors from network transmissions that are typically more stochastically distributed, it is recommended to enable Discard parity error if mirror matches, disable Prefer parity match, disable Probe for disk burst errors and enable Limit automatic correction to partially consistent data. If this doesn't produce the desired result it is recommended to turn off Discard parity error if mirror matches and Limit automatic correction to partially consistent data.
The security options can be accessed by clicking on the Security tab in the advanced settings dialog.
This option locks access to the ramdisk automatically after the specified interval has expired.
If checked and the current archive on the ramdisk in encrypted, the user is required to reenter the correct encryption key before the content will be unlocked.
If this option is enabled and the ramdisk is being locked, all archive keys except the primary key are deleted. This is a safeguard that prevents access to encrypted archives that have been read previously in the same session. If this option is not checked, these archives might still be accessible while the ramdisk is locked. If you leave your PC unattended it is recommended also to purge the primary key.
This prevents the caching of archive keys while the ramdisk is locked. If an archive manager window is closed, the archive data is also cleared from the cache.
Please note that the following rules apply to hibernation, i.e. the sleep mode a notebook enters to preserve battery power:
| 1. | If the archive is neither persistent nor encrypted it will be part of the memory image the operating system writes to hard disk on hibernation. |
| 2. | If you consider this a security risk, check Unload ramdisk before hibernation to remove the ramdisk content. |
| 3. | If you wish to preserve unsaved data, please select Prevent hibernation if data cannot be encrypted and set the encryption mode to encrypted. |
Bond Disc tries to secure your data before hibernation. If this is not possible without losing or compromising the data, hibernation is prevented if this option is enabled. This option works only for encrypted data.
Please note that this option is disabled by default. It is not recommended to enable this option on a battery powered computer, because preventing the computer to enter sleep mode can exhaust its power supply rapidly. The proper method to ensure that encrypted data is backed up is to enter a valid key before you start working with your data.
This option ensures that all keys are deleted before hibernation takes place. This is recommended to remove all traces of the keys from the memory image.
This ensures that the content on the ramdisk will not be part of the memory image written at hibernation. You do not need to set this option for encrypted data. Encrypted content is always purged from the ramdisk before the computer enters sleep mode. If there is no valid key to backup the data it is lost.
The encryption strength is stored with an archive on backup. The encryption strength of the primary key is restored when the archive is uploaded if this option is enabled. Otherwise the current encryption strength remains in effect.
This option flags the ramdisk content for backup if you set a new encryption key or change the encryption mode.
Archived files on which you double-click in the archive manager are transferred to the Windows shell to be opened. For this feature to work, the files need to be written to a temporary cache. Bond Disc tries to cache these files on the ramdisk, but if this is not possible the files are cached on a hard disk. This option prevents this type of caching. Please note that program files and scripts are exempt from this rule and are always cached on hard disk.
Check this if you wish your key to be stored and available after the next system start. This applies to any primary key that comes into effect once this option has been activated.
Note: Storing the key is a security risk. Only use this option if you are sure that your PC is safe from unauthorized access or you don't require strict security. Do not rely on your stored key being deleted once you disable this option. File system drivers on your PC might have copied or mirrored the data.
If you have selected to store the password, a small reminder icon shows up in the archive manager and encryption key editor.
 |
This is a reminder that the key is stored on this computer. This is a potential security risk. |
|
Extracts files from an archive |
There are two ways to extract files from an archive. First, you can drag files from the archive manager window to the desktop or a file manager window. In this case the Windows file manager performs the filtering of duplicate files. Alternatively, you can click on the extract button in the archive manager to extract files. This mode preserves the relative directory structure of the files being copied and you have additional options for filtering the copied files.
This box contains the full path of the target folder into which the files are copied. The directory structure of the archive is preserved in this extraction mode, i.e. a file stored in a subdirectory will be placed into the same subdirectory in the target folder. You can browse and select any target folder of your choice.
This box controls which files are being copied. Selected files copies files only, Selected files and folders copies the files and the content of the directories you have selected. All files copies the entire content of the archive.
In this box you can specify the file replacement policy, if a file with the same name and in the same directory exists already on the target volume. Replace if newer is the default.
|
Adds the files from an archive to the ramdisk |
You can trigger the add files action from the toolbar of the archive manager or from the file review of the control center.
Instead of uploading an archive to the ramdisk, which replaces its content, you can alternatively add the files of an archive to the ramdisk. If you choose the option to replace existing files only if they are newer, you can easily synchronize the files on the ramdisk with the files from an archive. For instance if you add the files from an archive retrieved from your notebook, only the files that have been modified or do not exist will be copied to the ramdisk.
If you trigger the add files action you are presented with a small dialog box in which you can specify whether the files that exist already on the ramdisk will be overwritten.
You can hide the replacement policy dialog by ticking the check box in the lower left corner of the dialog. In this case, if you trigger the add files action, the last option you selected is automatically applied. You can enable the replacement policy dialog again by checking the show file replace options in the lower right corner of the control center.
You can choose between a buffered and unbuffered file transfer in the upload options. If the transfer is unbuffered, the files are added one by one to the ramdisk. If the transfer is buffered, the default, the entire copy operation is rolled back if an error occurs.
Unless you have disabled this reminder in the upload options you will receive a warning if you trigger an action that deletes the current ramdisk content.
The reminder notifies you which items have not been saved. You can exclude an individual item from a backup by clearing its check mark, or choose to not save any item at all. The Cancel button revokes the action that triggered this warning.
The technical properties of an archive file can be reviewed. The technical properties pertain to the size and type of the data stored and are directly retrieved from the archive file header.
The archive properties can be accessed by clicking on the Properties item in the File menu of the archive manager.
The application information can be accessed by clicking on the About item in the Info menu of the archive manager or current session dialog.
The application information lists the current version of the Bond Disc software installed on your PC. It also refers you to our technical support website. You can review your license by clicking on the license button to the left.
The Bond Disc support website offers additional professional services to protect your archives and to support a wide range of corporate data protection schemes.
This is a paid-for service we offer to implement features that you request. What you receive in return is an enhanced Bond Disc version with the features you specified.
There is technically no limit to the features you can request, from the integration of Bond Disc with other applications to department based backup strategies. Some features require a standard fee, for others we will give you a quote based on the time we estimate the implementation will require. Our rates are competitive and our team has excellent skills.
Features that you can request include the following:
To uninstall the Bond Disc application please use the Windows control panel add or remove software feature. Alternatively you can right-click on the Bond Disc installer and select uninstall.
If you also wish to uninstall the ramdisk please open the Windows system properties and select device manager on the hardware tab. Next open the SecureDisc driver by double-clicking on it. Right-click on the SecureDisc item and choose uninstall. This will remove the Bond Disc driver and ramdisk from your system.
Bond Disc disables the system volume restore information for the ramdisk drive. This service is not necessary because Bond Disc uses its own methods to ensure the integrity of the ramdisk.
The Bond Disc installer enables the balloon tooltips for the Bond Disc taskbar icon. This is a non-intrusive way of providing the user with status messages without requiring dialog box prompts.
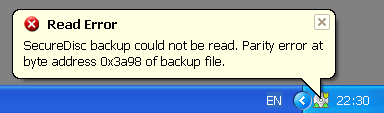 |
Bond Disc balloon tooltip |
Please note that if you disable balloon tooltips these status messages will not be available.
Please note that you need administrator rights to install the Bond Disc application and driver.
Download the Bond Disc installer and/or copy the file to your computer. Optionally, you can verify the SHA-2 checksum of the downloaded file to make sure the installer has not been tampered with.
First, save the content on the ramdisk, if you wish to keep the data.
Right-click on the Bond Disc taskbar icon and choose close. Open the control panel and choose software or programs; the exact term displayed varies slightly between different versions of Windows. Select the Bond Disc software and choose uninstall.
Double-click on the Bond Disc installer and follow the on-screen instructions.
If the Bond Disc taskbar icon, which looks like a silver disc, doesn't appear on the taskbar, please display the hidden icons by clicking on the small arrow symbol next to the visible icons. If you have the option to customize the icon, it is recommended that you select to show the icon always. The Bond Disc taskbar icon shows you the ramdisk and backup status at a glance and provides you access to the configuration dialog.
If you click on the Bond Disc taskbar icon, which looks like a silver disc, and the configuration dialog appears, you have successfully installed Bond Disc.
Depending on your security settings, on Windows Vista and later the Windows User Account Control (UAC) might block the installation of the Bond Disc driver. If you receive the message Driver is not installed/accessible, you need to start the setup application manually.
The SHA-2 checksums for the BondDisc.msi installation files are listed in the checksums section of our support website. You can generate the checksum for the downloaded file with a file checksum tool and validate it against the checksum on our website. If the checksums are not identic, the installation file has been tampered with.
If the Bond Disc driver has not been installed or a double-click on a Bond Disc archive with the .sec extension doesn't bring up the Bond Disc archive manager, it might be that you didn't run the installer with administrator rights.
One way to run the installer as administrator under Windows Vista or later, is to right-click on the downloaded installer file. Select Properties and switch to the Compatibility tab. Tick the box before Run this program in compatibility mode for and select Previous versions of Windows or Windows XP from the menu. Click on the OK button which saves your settings and closes the dialog. A double-click on the installer now should reinstall Bond Disc with a proper administrator token set, if you have adminstrator rights for your computer.
Depending on your Windows version and whether you installed Bond Disc as an administrator, you might need to run the SetupSecdiscDriver.exe manually. To do this open the BondDisc folder that is located in your Program Files folder, or Program Files (x86) folder on 64-bit Windows versions. Open the driver folder and double-click on the SetupSecdiscDriver file. This will install or update the ramdisk driver as needed.
If the driver setup fails with an error message and you have an older Bond Disc driver installed, uninstall the older driver manually as described in the uninstall section. After the ramdisk has been uninstalled, run the SetupSecdiscDriver.exe again as described in the preceding paragraph.
If you receive Access denied errors when you access an archive in the sealing or error correction dialog, or try to set a new drive letter for the ramdisk, this is caused by the Windows User Account Control (UAC).
If you are denied access to files in the error correction or seal dialogs, please make sure that you have write access to the files in the archive location. One way to resolve this is to copy the folder with the archives to your My Documents folder. Alternatively, you can run the Bond Disc application as an administrator. For details, please see the next paragraph.
If you receive an access denied error while attempting to choose a different drive letter, please restart Bond Disc as an administrator. Richt-click on the Bond Disc taskbar icon and choose close. Locate the BondDisc.exe in your Program Files folder, or Program Files (x86) folder on 64-bit Windows versions, and right-click on it. Choose Run as administrator.
If the Bond Disc taskbar icon doesn't appear on the taskbar, first try to display the hidden icons by clicking on the small arrow symbol next to the shown icons. If you have the option to customize the icon, it is recommended that you select to show the icon always. The Bond Disc taskbar icon shows you the ramdisk and backup status at a glance and provides you access to the configuration dialog.
If the Bond Disc taskbar icon doesn't appear on your PC it means that the Bond Disc application did not start up. You can start Bond Disc manually from the Windows start program menu or by double-clicking on a Bond Disc archive.
If you can't start up Bond Disc manually, please try uninstalling and reinstalling the Bond Disc application. Normally the installer sets Bond Disc to autostart after system boot. It is also launched immediately after the installer completes.
If the Bond Disc application tells you that the driver is not accessible or the ramdisk drive is not displayed in the system drives list, it might be that the Bond Disc driver is not installed properly. It is normally launched after system boot, so it is worth trying to reboot your system.
If the driver is still not accessible after reboot you can check the driver status in the Windows device manager. Please open the Windows system properties and select device manager on the hardware tab. Next open the SecureDisc driver by double-clicking on it, if it does exist. You can then open the SecureDisc item and examine its properties.
If the Bond Disc driver is not installed or does not function properly you can try to reinstall it. For this open your program files folder, navigate to the BondDisc folder and open the driver folder within it. A double-click on the SetupSecdiscDriver application will check the driver version and reinstall the driver if appropriate. If this does not work, please try to uninstall the ramdisk first.
If this doesn't resolve your problem, please visit our technical support website.
If you experience issues running Bond Disc on your PC, our technical support can assist you. Our support website is available at www.bonddisc.com.
The users that have a professional license receive priority support.
All other support requests are queued and served in the order they were issued. While we do our best to serve all support requests, please note that our resources are limited, and sometimes it is simply not possible to reply to all support requests in a timely manner. Please check the FAQ section on our support website for solutions and workarounds that have already been supplied. Please do not request support for an issue that has already been addressed.